
Installing a new ceiling fan can seem like a daunting task for even the most experienced DIYers, but with the right guidance and tools, it can be surprisingly easy. The Harbor Breeze Ceiling Fan Installation Guide provides step-by-step instructions to help you tackle this project in no time. From selecting the perfect fan for your space to putting the finishing touches on your installation, this guide will make sure that you don’t miss a single detail. With detailed instructions, you’ll have all of the information you need to properly mount your fan and make sure it runs safely and efficiently. Plus, you’ll be able to save money by avoiding costly mistakes when wiring or installing the fan yourself. So read out to learn more!
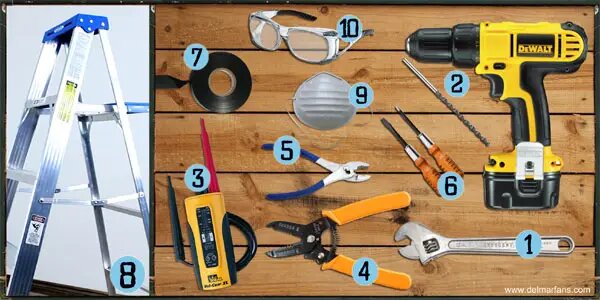
When it comes to installing a ceiling fan, you’ll want to make sure that you have the right tools and equipment. The wrong tool could not only delay your project but also lead to potential safety issues or costly repairs. To ensure that your installation goes smoothly, here are 10 recommended tools for installing a ceiling fan:
To ensure your ceiling fan installation project is successful and without personal injury or property damage, be sure to apply the following safety precautions and warnings:

Following these safety instructions and warnings will ensure that your ceiling fan installation project is a safe and successful one. Remember, safety comes first!
It is essential to select the correct installation site when selecting a ceiling fan – it’s as important as picking out the fan itself! Opting for an ideal site will guarantee your safety, and improve the operation and effectiveness of your fan. When making this selection, these details must be taken into account:

By following these guidelines for ideal fan placement, you can ensure that your ceiling fan is not only the perfect fit for your home but also a safe and efficient one.

Uninstalling a ceiling fan is not particularly difficult, but it does require some specific steps. To ensure you follow the correct procedure for removing your fan safely, use this guide to help you through the process.
1. Turn off the power supply – Before attempting to uninstall your fan, ensure that all power to the fan has been disconnected. The power can usually be shut off at the circuit breaker or fuse box.
2. Remove fan blades – Once the power has been disconnected, begin by carefully removing the fan blades with a screwdriver and setting them aside in a safe place.
3. Unscrew mounting bolts – Now that the blades have been removed, locate the mounting bolts that secure the fan to the ceiling and unscrew them from their position.
4. Disconnect wiring – The last step before actually removing your fan is to disconnect any wiring that may be present. Depending on your fan model, this could require a few additional steps but should ultimately end with all wires being disconnected from the fan.
5. Remove fan – Finally, with all bolts and wires detached, you can remove the fan from the ceiling. Carefully lower the fan down to safety and dispose of it according to your municipality regulations.
With these simple steps in mind, you should have no difficulty safely uninstalling your ceiling fan.
Here is a step-by-step guide to help you install your Casablanca ceiling fan:
Before beginning any electrical work, it is essential to make sure that the electricity to the circuit is completely shut off and disconnected. To begin removing an existing light fixture, carefully take out the glass shade or globe from the fixture. Unscrew any retaining nuts or screws that are holding the light in place and then lower the entire unit down. Disconnect the wires by twisting off the plastic connectors from each end of the wire. This will ensure that the old light is safely and correctly removed.
Removing an existing electrical box from the ceiling and replacing it with a new one requires some careful preparation. If the box is nailed to a joist, you can use a flat bar to pry it away. Alternatively, if it is suspended from a metal plate, you may need to remove the plate in order to unscrew the box, followed by prying the bar from the joists.
Once it is removed, use a 1/2-inch-thick pancake box as a template and trace around it onto the ceiling with a pencil. Finally, cut along the line with a drywall saw for an accurate fit. Consider holding a vacuum cleaner wand next to the saw to catch dust as you cut. This can help keep the area clean and tidy.
Attaching a new electrical box requires several steps to ensure it is installed correctly and safely. Begin by feeding the cable from the ceiling through the knockout hole in the pancake box. Make sure that there is a cable connector positioned around the knockout hole. Place the box into the hole cut into the ceiling, pressing it firmly against the bottom of the joist. Secure the box to the joist using two No. 10 hex-head screws that measure 1 1/2 inches in length. Use a drill or driver with a 5/16-inch nut-driver tip to drive in the screws. Finally, wrap the cable’s bare copper wire around the grounding screw inside the box and leave the wire end hanging. Once these steps are complete, the electrical box is securely attached.
Before installing a ceiling medallion, it is important to prepare the area and have any necessary tools nearby. Start by cleaning the surface of the ceiling, then measure the area of installation to ensure that the medallion will fit properly. Gather all necessary materials for this task – such as a ladder, urethane-based adhesive, 6d finishing nails, caulk, and spackle.

Begin by applying a small amount of urethane-based adhesive to the back of the medallion. Pass the wires through the medallion and center it above the pancake box. Press firmly to secure, then position four 6d finishing nails into the joist to fasten the medallion. Once the nails have been placed, use caulk or spackle to fill in the nailheads and complete the installation.
Before installing a ceiling fan, the ceiling plate needs to be securely mounted. The metal plate is first held up to the electrical box in the ceiling and the wiring is threaded through its center opening. The plate is then secured to the box by two 1 1/2-inch-long 10-32 machine screws. If decorating or painting the ceiling plate medallion is desired, it should be done prior to attaching the plate.
Before you begin assembling the fan components, make sure that you have all of the necessary equipment and tools. First, place the fan on the floor and carefully feed the wires from the motor through the center of the canopy.

Securely set the canopy on top of the motor, and then pass the wires through the hollow down-rod pipe. Thread the down-rod pipe into the top of the motor and firmly tighten the square-head locking screw on the side of the pipe. Keep in mind that there is a factory-applied coating on the pipe threads, so do not remove this as it helps to keep the pipe from unscrewing.
Hang one segment of the fan canopy securely onto the ceiling plate. Once that is secured, take the two green wires and attach them to the bare copper wire inside the wiring. It is important to note that if your particular room is wired differently than shown in this guide, it is advisable to seek help from a certified electrician. Connect the two white wires as well as the two black wires together, then swing the fan up into its position against the medallion and secure it with two canopy screws.
Attaching the fan blades and lights is an important step in installing the ceiling fan. Begin by connecting each blade to its own blade iron, which is a bracket that holds the blade to the motor. To secure the blade irons, you will need to use the screws provided with the fan. After attaching the blades, plug in the light-fixture housing to the wire hanging from the motor. Install any shades and lightbulbs that came with the fan, and finally screw the plastic holder for the remote control to the wall switch. This is typically placed nearby for convenience.
So there you have it – an easy-to-follow guide on how to correctly install a ceiling fan. With the right tools, patience, and knowledge of electrical systems, you can now safely and successfully install your own ceiling fan.
Installing a ceiling fan can be a great way to add an interesting decor element to any room, while also providing a much-needed source of air movement. But in order to install it properly, you’ll need some knowledge and the right materials and tools.

First, start by preparing the mounting bracket. Secure the bracket to the outlet box with the supplied screws and washers, then feed the electrical wires through the opening. Remove any shipping blocks from the motor and set them aside (you’ll need these later).

Next, assemble the motor housing. Loosen and cut the ceiling fan wires to 6 inches longer than your chosen downrod, then strip off ½ inch of insulation from the ends. Remove the set screw from the motor coupling, thread the wires through the pre-assembled downrod and hand tighten it onto the coupling (about 4-5 full turns). Finally, fasten in the setscrew with pliers and pull the wires and downrod through the canopy. Allow this to sit loosely on top of the motor housing.
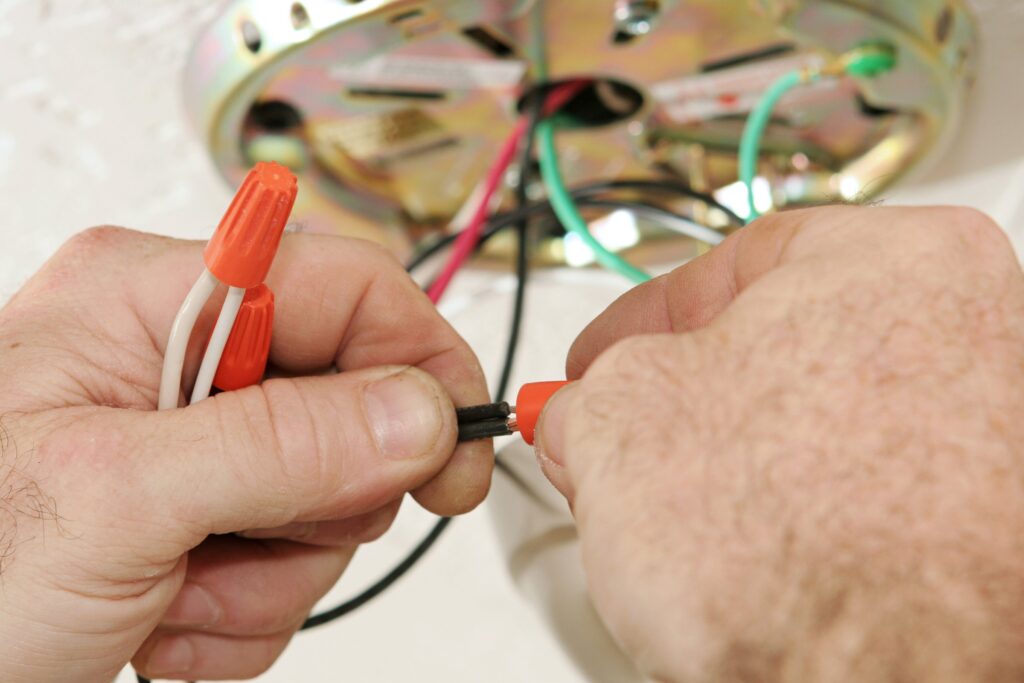
Start by lifting the motor assembly and placing the downrod ball into the slot in the ceiling bracket. Rotate it until the fan locks into place and then attach the wall control receiver to its mounting bracket. To connect all of the wires correctly and safely, take the bare metal leads and join them together. Place a plastic wire connector over them and then twist it in a clockwise direction until it is firmly secured.

To connect the ceiling fan wiring and receiver wires, make sure to ground all of the wires from the ceiling, downrod, and hanging bracket by using a wire nut. Afterward, join the white wire from the fan and the white wire from the receiver marked “To Motor” with a wire nut, as well as with the black wires from both of these components. Lastly, do the same for the blue wires that come from each of them. Twist securely until they are firmly attached.
To effectively connect the supply line and receiver, start by locating the black wire from the ceiling and the black wire from the receiver which will be marked “AC In”. Use a wire nut to securely attach these two together in a neat and safe manner. Then repeat this process with the white wire from the ceiling and the white wire from the receiver. Once this is done, thread the connections up through the hanger bracket and into the outlet box. Finally separate the grounded wires from the ungrounded ones, ensuring not to pinch any of them while doing so.
To start, you’ll need to remove the switch plate cover and disconnect all wiring attached to it. Next, connect the black wires in the outlet box together. Then, attach the green wires from the outlet box to the grounding wires from the wall control. Once the connections have been made, push all wiring back into the outlet box, making sure to separate them as needed – with grounded wires on one side and black wires on the other. Finally, insert the wall control into the outlet box and secure it using the provided screws before replacing the switch plate cover with its accompanying screws.

The installation of a canopy is an important aspect of setting up a fan. To begin, you will need to locate the mounting bracket on the fan and align it with the holes in the canopy. Securely insert the canopy screws into these holes in order to keep everything in place.
Next, attach each of the blades by inserting the grommets into the holes in them and then securing each one to the blade iron using the screws provided. Then, lightly attach the blade irons to the motor housing with more screws. Make sure all these screws are tightened once all blades are attached.

Insert two housing assembly screws into the motor housing by choosing any two screw holes you prefer. Put the wire supply through the center hole of the upper switch housing and wrap the keyhole slots around the screws in a counterclockwise direction to lock them into place. After that, insert a third screw and tighten all three screws. This will complete your fan’s assembly process.

The installation of a light kit to a ceiling fan is not a difficult task, however, it can have some variability depending on the type of fan you have. To begin, you will need to connect the plugs from the upper and lower switch housings and make sure that their colors match each other. Next, lift up the lower switch housing and align it with the screw holes in the upper switch housing and insert three switch housing screws. Following this, loosen the thumbscrews on the light kit and thread the glass shade tightly to secure it in place. Finally, install a bulb into each of the light sockets.
Attach the pull chain or fandango to the small link stretching from the switch housing.

To begin, switch on the circuit breaker and wall switch to provide power. Then sync your ceiling fan with the wall switch (note that instructions may vary depending on what kind of fan model you have).

Testing a ceiling fan is an important task in order to ensure that it works properly for cooling and lighting. To test a fan, first, turn on the fan and make sure it runs on all speed settings. Then make sure that the lights connected to the fan turn on and off independently of the fan itself. If your fan has a reversible function, you can confirm the blades spin in an opposite direction by reversing the airflow.
So there you have it – a complete guide to installing a ceiling fan. With these easy-to-follow steps, you’ll be able to successfully install your own stylish and efficient fan in no time!